Each phase of a skydive jump requires a specific and strict action protocol. In this section, we will address the details of the parachute deployment process, the functionality check, and the navigation protocols after deployment.
To provide a detailed overview of the procedures involved in the deployment process, we will thoroughly describe the following safety measures and the phases they comprise:
• Phases and priorities of deployment.
• Correct body position and deployment sequence.
• Canopy check.
• How to achieve maximum performance.
• Deployments in clouds.
• Collisions under canopy.
Phases and priorities of deployment
Among the multiple procedures that make up a skydive, the most fundamental and mandatory is to deploy the parachute. However, deployment must respect other priorities in order to maximize safety. According to Section 1-A of the Skydiver’s Information Manual (SIM) from the United States Parachute Association (USPA), the deployment priorities are:
- Deploy the parachute.
- Deploy at the correct altitude.
- Deploy at the correct altitude in a stable body position.
Likewise, the deployment process is composed of three phases:
• Activation: the moment when the deployment handle is grabbedand thrown into the relative wind so that the pilot chute inflates.
• Extraction: occurs when the main closing pin no longer locks the main container, allowing extraction of the deployment bag that contains the canopy.
• Inflation: the process by which the canopy cells pressurize with
Correct body position and deployment sequence
It is important to maintain a correct body position during deployment, as asymmetric body configurations can cause high-speed or low-speed malfunctions. At the moment of deployment, a neutral position (“box position”) must be maintained, and the following sequence executed in order:
- Wave: Alert other skydivers that you are about to deploy your parachute by giving the arm movement signal (“wave-off”).
- Arch: Maintain the neutral body position with a well-pronounced arch.
- Reach: Locate the main deployment handle with the right hand, compensating with the left hand in front of the face to maintain balance.
- Pull: Extract the main deployment handle, throwing it into the relative wind. Once the pilot chute is extracted, return to the neutral position.
Canopy check
Once the canopy has deployed, the first check must be performed to confirm its roper condition:
• Is the canopy there?
• Does the canopy have the correct shape and size?
• Has the slider descended at least halfway down the lines?
• Is the canopy steerable? Perform a full controllability check to confirm that the parachute can turn in all directions and can be properly flared. If it is not ontrollable, the emergency procedure must be executed before reaching the decision altitude.
After confirming the canopy is functioning properly, proceed to the holding area, always aware of altitude, traffic, position relative to the ground, and wind strength.
The flowchart designed by the USPA that describes the canopy check is shown below: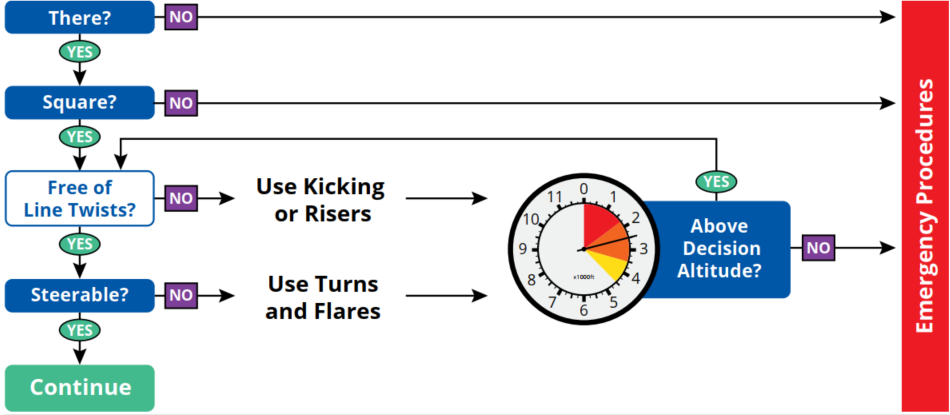
(Image from https://www.uspa.org/skydiveschool/a on 06/17/2025)
How to achieve maximum performance?
Like any wing, parachute canopies are designed to fly with maximum performance, allowing maneuvers to be executed efficiently and safely, especially during landing, when the vertical component of speed is transformed into horizontal lift through the maneuver known as “flare,” which enables a level touchdown relative to the ground.
Once the canopy has passed the controllability check, it can be configured for maximum flight performance through the following two actions:
- Collapse the slider: This minimizes drag from the relative wind, allowing the canopy to fly more efficiently and providing a stronger flare during landing.
- Loosen the chest strap: By loosening this strap, the center of gravity of the canopy-pilot system shifts forward, resulting in a more natural and comfortable position during landing. Additionally, this allows the wing to fully extend across its span, bringing the lines and risers to maximum extension, which significantly improves control sensitivity and effectiveness—both during turns and in the flare.